Search Results for: Photo

125 Years of Topographic Mapping – ArcNews Fall 2009 Issue

125 Years of Topographic Mapping – ArcNews Fall 2009 Issue

In the late 19th century, surveyors created topographic maps in the field. They measured a series of points in the field, using tape and compass traverses with elevations determined with an aneroid barometer and used in a process known as field sketching to draw a terrain representation using contours. The introduction of the plane table and alidade, which could measure vertical angles, point positions, and elevations much more rapidly, greatly increased the accuracy of data shown on topographic maps but still required the surveyor to field sketch the contours after control points had been identified. The aid of a visual three-dimensional model in the office to construct the surface representation awaited the development of photogrammetry.

During this time, USGS maps were created at scales of 1:250,000 for 1-degree areas and 1:125,000 for 30-minute areas. The scales were increased with time, and by 1894, most of the maps were created for 15-minute areas and produced at a scale of 1:62,500. Features shown on the maps included civil divisions of state, county, township, and city or village; public works, including railroads, tunnels, wagon roads, trails, bridges, ferries, fords, dams, canals, and acequias; hypsography with contours and floodplain representations; and miscellaneous features of forest, sand, and sand dunes.

The reproduction of maps from the original field sketches used a lithographic printing process based on copper plates. The image of the topographic features was engraved on the copper plates. A three-color process was used with civil divisions and public works in black, hydrography in blue, and hypsography and miscellaneous features in brown.

Building Shadow Analysis Program

Building Shadow Analysis Program

Earlier this week I wrote a small PHP script for analysis of the shadow cast by buildings on the surrounding landscape. To obtain sun position and altitude, it relies on SunCalc PHP which must be included in the script. It goes throughout the year, churning out how much of a shadow a building will produce each hour, in feet and direction. Additionally, the script will calculate the maximum point the shadow will be cast as a set of coordinates.

<?php
// The current values entered into this script currently are for the Empire Plaza.
$latitude =  42.64915; 
$longitude = -73.75950; 
$height =  610;

$start = strtotime("January 1, 2020 12 AM");
$end = strtotime("December 31, 2020 11 PM");

include("suncalc.php");

// Compass as a Reference
$compass = array(
			'north', 'north-northeast', 'northeast',
			'east-northeast', 'east', 'east-southeast',
			'southeast', 'south-southeast', 'south',
			'south-southwest', 'southwest',
			'west-southwest', 'west', 'west-northwest',
			'northwest', 'north-northwest');

function newPos($lat, $lng, $dist, $dir) {
    // Earth Radius in KM
    $R = 6378.14;
    
    // distance in feet to KM
    $d = (($dist * 0.3048) / 1000);

    // Degree to Radian
    $lat1 = $lat * (M_PI/180);
    $lng1 = $lng * (M_PI/180);
    $brng = $dir * (M_PI/180);

    // Really Complicated Math (TM) that works based on the HAVERSINE formula from 
    // https://stackoverflow.com/questions/7222382/get-lat-long-given-current-point-distance-and-bearing
    $lat2 = asin(sin($lat1)*cos($d/$R) + cos($lat1)*sin($d/$R)*cos($brng));
    $lng2 = $lng1 + atan2(sin($brng)*sin($d/$R)*cos($lat1),cos($d/$R)-sin($lat1)*sin($lat2));

    # back to degrees
    $lat2 = $lat2 * (180/M_PI);
    $lng2 = $lng2 * (180/M_PI);

  return "$lat2,$lng2";
}

$output = "Month,Day,Hour,Sun Angle,Sun Position,Sun Pos Name,Shadow Length,Shadow Direction,Shadow Dir Name,Orginal Lat, Original Lng, Maximum Shadow Lat, Maximum Shadow Lng\n";
for ($time = $start; $time &amp;lt; $end; $time += 60*60) { // get sun position for time $timeObj = new DateTime(); $timeObj-&amp;gt;setTimestamp($time);
	
	$sc = new AurorasLive\SunCalc($timeObj, $latitude, $longitude);
	$sunPos = $sc-&amp;gt;getSunPosition($timeObj);

	// don't include any time when sun is below the horizon
	if ($sunPos-&amp;gt;altitude*(180/M_PI) &amp;lt; 0) continue; // add month, day, hour $output .= date('n,j,G,',$time); // get sun altitude $output .= $sunPos-&amp;gt;altitude*(180/M_PI).',';
	
	// get sun position
	$output .= 180+$sunPos-&amp;gt;azimuth*(180/M_PI).',';
	$output .= $compass[round((180+$sunPos-&amp;gt;azimuth*(180/M_PI))/ 22.5) % 16].',';	
	
	// shadow length
	$output .= $height/tan(deg2rad($sunPos-&amp;gt;altitude*(180/M_PI))).',';
	
	// shadow direction
	$shadowDir = $sunPos-&amp;gt;azimuth*(180/M_PI) + 360;
	if ($shadowDir &amp;gt; 360) $shadowDir -= 360;
	
	$output .= $shadowDir.',';
	$output .= $compass[round($shadowDir/ 22.5) % 16].',';

	// building latitude and longitude
	$output .= "$latitude, $longitude,";
	
	// maximum extent of shadow
	$output .= newPos($latitude, $longitude, $height/tan(deg2rad($sunPos-&amp;gt;altitude*(180/M_PI))), $shadowDir).",";	
	
	$output .= "\n";	
}

echo $output;

Here is an example output:

Month,Day,Hour,Sun Angle,Sun Position,Sun Pos Name,Shadow Length,Shadow Direction,Shadow Dir Name,Orginal Lat, Original Lng, Maximum Shadow Lat, Maximum Shadow Lng
1,1,8,4.370562595888,127.16997476055,southeast,7981.2630997694,307.16997476055,northwest,42.64915, -73.7595,42.662350867593,-73.783180446551,
1,1,9,12.464234785715,138.47001937172,southeast,2759.6833421566,318.47001937172,northwest,42.64915, -73.7595,42.654806428356,-73.766311948646,
1,1,10,18.826346377511,151.18871989968,south-southeast,1789.1660233981,331.18871989968,north-northwest,42.64915, -73.7595,42.653442385927,-73.762710054908,
1,1,11,22.92597731207,165.29270254371,south-southeast,1442.2476816852,345.29270254371,north-northwest,42.64915, -73.7595,42.652969571748,-73.76086316453,
1,1,12,24.317973645092,180.27827074558,south,1349.8710413416,0.27827074557518,north,42.64915, -73.7595,42.652845989302,-73.7594755931,
1,1,13,22.827705402895,195.24737437252,south-southwest,1449.1706789769,15.247374372522,north-northeast,42.64915, -73.7595,42.652978239559,-73.758081165062,
1,1,14,18.641667869753,209.31025239405,south-southwest,1808.2272087538,29.310252394054,north-northeast,42.64915, -73.7595,42.653467170112,-73.756204500047,
1,1,15,12.211118961179,221.98033545934,southwest,2818.7133569306,41.980335459338,northeast,42.64915, -73.7595,42.654887013398,-73.752480800429,
1,1,16,4.0670753820534,233.23837174035,southwest,8579.0650125467,53.238371740354,northeast,42.64915, -73.7595,42.663205632648,-73.733908619093,
1,2,8,4.3645441749857,127.03353849744,southeast,7992.3115188513,307.03353849744,northwest,42.64915, -73.7595,42.662327567958,-73.783255965565,
1,2,9,12.476443037614,138.33095911417,southeast,2756.8958218911,318.33095911417,northwest,42.64915, -73.7595,42.654788550435,-73.766323694576,
1,2,10,18.860737296743,151.04916237459,south-southeast,1785.6561891219,331.04916237459,north-northwest,42.64915, -73.7595,42.653428213262,-73.762717935368,
1,2,11,22.985140372821,165.15894624042,south-southeast,1438.1068136859,345.15894624042,north-northwest,42.64915, -73.7595,42.652956261035,-73.760871335783,
1,2,12,24.401639825801,180.15947237405,south,1344.6352402431,0.15947237405339,north,42.64915, -73.7595,42.652831682677,-73.759486067027,
1,2,13,22.932215921968,195.15131682951,south-southwest,1441.810083379,15.151316829514,north-northeast,42.64915, -73.7595,42.652960530629,-73.7580970562,
1,2,14,18.761308368827,209.23956034287,south-southwest,1795.8375075952,29.239560342872,north-northeast,42.64915, -73.7595,42.653440556697,-73.756234277101,
1,2,15,12.340240887742,221.93268535805,southwest,2788.302504508,41.932685358049,northeast,42.64915, -73.7595,42.654829364851,-73.752562956502,
1,2,16,4.2013827926665,233.20922777897,southwest,8303.8756666826,53.209227778967,northeast,42.64915, -73.7595,42.662764126188,-73.734739101558,

Egg Highlighted

QGIS Python API – How to Export a Map

Here is the Python code I use with QGIS 3.0 to export to an image from a layout you have previously set up and saved in your project.

        layout = QgsProject.instance().layoutManager().layoutByName("YourLayoutName")
        export = QgsLayoutExporter(layout)
        export.exportToImage("YourPath/YourFilename"+".jpg", QgsLayoutExporter.ImageExportSettings())

For a PDF export you would use:

        layout = QgsProject.instance().layoutManager().layoutByName("YourLayoutName")
        export = QgsLayoutExporter(layout)
        export.exportToPdf("YourPath/YourFilename"+".pdf", QgsLayoutExporter.PdfExportSettings())

The API is a bit confusing, and some things are broken out of the box in QGIS 3.0 but it’s gotten better with subsequent revisions. QGISLayoutExporter API Documentation. I suggest updating your version of QGIS to the latest stable version, which as of now is QGIS 3.4.3 but may be newer depending on when you find this webpage.

Warmth

Arduino GPS Logger Code I Wrote

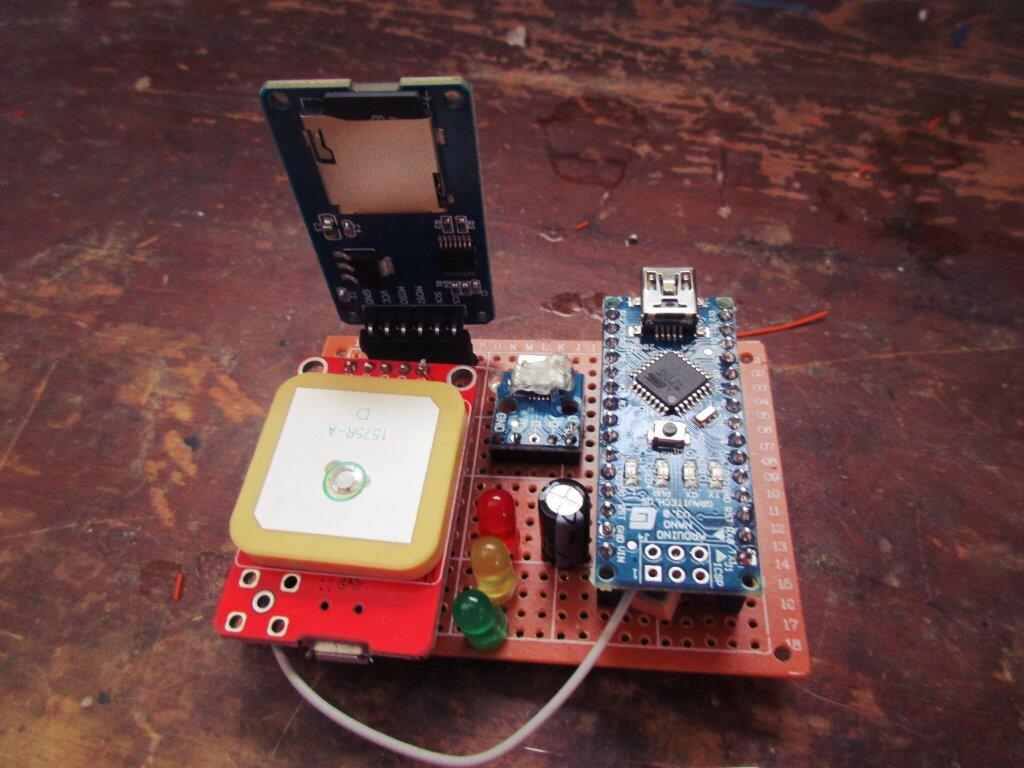
Below is theΒ current version of the code I use for my GPS logger,Β which is powered by a Neo 6M GPS unit, an Arduino SD Card Reader with an 8 GB MicroSD Card, and an Arduino Nano. It logs a wide variety of information about my current location, speed of travel, and other information so I can easily look back at my trip.

 GPS Logger

/*
   GPS Logger

      SD card attached to SPI bus as follows:
    *  ** CS - pin 10
 ** MOSI - pin 11
 ** MISO - pin 12
 ** CLK - pin 13

*/

#include &amp;amp;amp;amp;lt;TinyGPS++.h&amp;amp;amp;amp;gt;
char p_buffer[100];
#define P(str) (strcpy_P(p_buffer, PSTR(str)), p_buffer)

#define HOMELAT  42.614277
#define HOMELNG -73.851662

#include &amp;amp;amp;amp;lt;SoftwareSerial.h&amp;amp;amp;amp;gt;

// The serial connection to the GPS module
SoftwareSerial ss(4, 3);

// The TinyGPS++ object
TinyGPSPlus gps;

// Line Buffer to Save to File
char lnBuffer[115];

// Decimal to Number Char String Buffer
char numStr[30];

// delay
uint8_t prevSecond;

// data logger
#include &amp;amp;amp;amp;lt;SPI.h&amp;amp;amp;amp;gt;
#include &amp;amp;amp;amp;lt;SD.h&amp;amp;amp;amp;gt;

const uint8_t chipSelect = 10;

// location of previous location, used
// to calculate distance traveled
float prevLat = 0;
float prevLng = 0;
float prevAlt = 0; // stored in meters
float prevSpeed = 0; // stored in meters per second
float prevTime = 0;

// keep a running total of miles since last boot
float milesSinceBoot = 0;

// filename
char fileName[13];

// don't do anything if card is bad
bool cardWorks = false;

void setup() {
  Serial.begin(115200);
  ss.begin(9600);
  for (uint8_t i = 6; i &amp;amp;amp;amp;lt; 9; i++) {
    pinMode(i, OUTPUT);
    digitalWrite(i, LOW);
  }


  // see if the card is present and can be initialized:
  if (!SD.begin(chipSelect)) {
    Serial.println(F(&amp;amp;amp;amp;quot;Card failed, or not present&amp;amp;amp;amp;quot;));
    digitalWrite(8, HIGH); //red
    cardWorks = false;

    // don't do anything more:
    return;
  }

  cardWorks = true;
  Serial.println(F(&amp;amp;amp;amp;quot;card initialized.&amp;amp;amp;amp;quot;));
  digitalWrite(6, HIGH);  // green

  fileName[0] = '&amp;amp;amp;amp;#92;&amp;amp;amp;amp;#48;';
}

void loop() {
  if (!cardWorks) {

    return;
  }

  while (ss.available() &amp;amp;amp;amp;gt; 0) {
    gps.encode(ss.read());
  }

  // if no GPS blink red LED
  if (millis() &amp;amp;amp;amp;gt; 5000 &amp;amp;amp;amp;amp;&amp;amp;amp;amp;amp; gps.charsProcessed() &amp;amp;amp;amp;lt; 10 &amp;amp;amp;amp;amp;&amp;amp;amp;amp;amp; millis() % 1000 == 0) {
    digitalWrite(8, HIGH); //red
  }
  else if (millis() &amp;amp;amp;amp;gt; 5000 &amp;amp;amp;amp;amp;&amp;amp;amp;amp;amp; gps.charsProcessed() &amp;amp;amp;amp;lt; 10 &amp;amp;amp;amp;amp;&amp;amp;amp;amp;amp; millis() % 500 == 0) {
    digitalWrite(8, LOW); // red
  }

  // check if we have a valid location and blink yellow if invalid
  if (gps.location.isValid()) {
    digitalWrite(7, LOW);  // yellow
  }
  // next two lines will blink yellow (eye catching!)
  else if (!gps.location.isValid() &amp;amp;amp;amp;amp;&amp;amp;amp;amp;amp; millis() % 1000 == 0) {
    digitalWrite(7, HIGH);  // yellow
  }
  else if (!gps.location.isValid() &amp;amp;amp;amp;amp;&amp;amp;amp;amp;amp; millis() % 500 == 0) {
    digitalWrite(7, LOW);  // yellow
  }

  if (gps.location.isValid() &amp;amp;amp;amp;amp;&amp;amp;amp;amp;amp; gps.time.second() != prevSecond) {

    // before we forget, log previous second
    prevSecond = gps.time.second();

    // if no file name, create
    if (fileName[0] == '&amp;amp;amp;amp;#92;&amp;amp;amp;amp;#48;') {
      // create filename
      // Example Filename = 03140201 (year=17, month=03, date=14, hour=02, tripnumber = 0
      uint8_t trip = 1;
      sprintf(fileName, P(&amp;amp;amp;amp;quot;%02d%02d%02d%02d.CSV&amp;amp;amp;amp;quot;), gps.date.year() - 2000, gps.date.month(), gps.date.day(), trip);

      // well, if we have made 99 trips today (usually due to bad power connection) only write final trip
      while (SD.exists(fileName) &amp;amp;amp;amp;amp;&amp;amp;amp;amp;amp; trip &amp;amp;amp;amp;lt; 99) {
        trip++;
        sprintf(fileName, P(&amp;amp;amp;amp;quot;%02d%02d%02d%02d.CSV&amp;amp;amp;amp;quot;), gps.date.year() - 2000, gps.date.month(), gps.date.day(), trip);
      }

      // print to serial where this data is being saved
      Serial.print(P(&amp;amp;amp;amp;quot;Writing to ... &amp;amp;amp;amp;quot;));
      Serial.print(fileName);
      Serial.print(P(&amp;amp;amp;amp;quot;\n&amp;amp;amp;amp;quot;));

      // write header to file
      File dataFileHead = SD.open(fileName, FILE_WRITE);

      // if not able to write, then turn LED red
      if (!dataFileHead) {
        digitalWrite(6, LOW);  // green
        digitalWrite(8, HIGH); //red
      }

      if (dataFileHead &amp;amp;amp;amp;amp;&amp;amp;amp;amp;amp; trip != 99) {
        dataFileHead.println(P(&amp;amp;amp;amp;quot;year,month,day,hour,minute,second,sat,latitude,longitude,elev,mph,dir,cdir,grade,accel,trip,mihm,dirhm&amp;amp;amp;amp;quot;));
        Serial.println( P(&amp;amp;amp;amp;quot;year,month,day,hour,minute,second,sat,latitude,longitude,elev,mph,dir,cdir,grade,accel,trip,mihm,dirhm&amp;amp;amp;amp;quot;));
        lnBuffer[0] = '&amp;amp;amp;amp;#92;&amp;amp;amp;amp;#48;';
        dataFileHead.close();

        digitalWrite(6, HIGH);  // green
        digitalWrite(8, LOW); //red
      }

    }

    // dont log if no satellites found
    if (!gps.satellites.value()) return;

    sprintf(numStr, P(&amp;amp;amp;amp;quot;%04d,%02d,%02d,%02d,%02d,%02d, &amp;amp;amp;amp;quot;), gps.date.year(), gps.date.month(), gps.date.day(), gps.time.hour(), gps.time.minute(), gps.time.second());
    strcat(lnBuffer, numStr);


    dtostrf(gps.satellites.value(), 3, 0, numStr);
    if (gps.satellites.isValid())
      strcat(lnBuffer, numStr);
    strcat(lnBuffer, P(&amp;amp;amp;amp;quot;, &amp;amp;amp;amp;quot;));


    dtostrf(gps.location.lat(), 10, 6, numStr);
    if (gps.location.isValid())
      strcat(lnBuffer, numStr);

    strcat(lnBuffer, P(&amp;amp;amp;amp;quot;, &amp;amp;amp;amp;quot;));


    dtostrf(gps.location.lng(), 10, 6, numStr);

    if (gps.location.isValid())
      strcat(lnBuffer, numStr);

    strcat(lnBuffer, P(&amp;amp;amp;amp;quot;, &amp;amp;amp;amp;quot;));

    if (gps.altitude.isValid())
      dtostrf(gps.altitude.feet(), 5, 0, numStr);

    strcat(lnBuffer, numStr);

    // we only add the additional info if we have enough buffer space
    // as occassionally before I was accidentially causing the buffer to
    // overflow. In an idea world, I'd use a bigger buffer but RAM is limited
    // e.g. if (strlen(lnBuffer) &amp;amp;amp;amp;lt; 100)

    if (strlen(lnBuffer) &amp;amp;amp;amp;lt; 100)
      strcat(lnBuffer, P(&amp;amp;amp;amp;quot;, &amp;amp;amp;amp;quot;));

    dtostrf(gps.speed.mph(), 0, 1, numStr);

    if (strlen(lnBuffer) &amp;amp;amp;amp;lt; 100)
      strcat(lnBuffer, numStr);

    if (strlen(lnBuffer) &amp;amp;amp;amp;lt; 100)
      strcat(lnBuffer, P(&amp;amp;amp;amp;quot;, &amp;amp;amp;amp;quot;));

    dtostrf(gps.course.deg(), 0, 1, numStr);

    if (strlen(lnBuffer) &amp;amp;amp;amp;lt; 100)
      strcat(lnBuffer, numStr);

    if (strlen(lnBuffer) &amp;amp;amp;amp;lt; 100)
      strcat(lnBuffer, P(&amp;amp;amp;amp;quot;, &amp;amp;amp;amp;quot;));

    if (strlen(lnBuffer) &amp;amp;amp;amp;lt; 100)
      strcat(lnBuffer, TinyGPSPlus::cardinal(gps.course.deg()));

    if (strlen(lnBuffer) &amp;amp;amp;amp;lt; 100)
      strcat(lnBuffer, P(&amp;amp;amp;amp;quot;, &amp;amp;amp;amp;quot;));

    // calculate current grade -- if we have a change in altitude
    // and we've traveled some kind of distance

    if (gps.altitude.isValid() &amp;amp;amp;amp;amp;&amp;amp;amp;amp;amp; (gps.altitude.meters() - prevAlt) != 0 &amp;amp;amp;amp;amp;&amp;amp;amp;amp;amp; TinyGPSPlus::distanceBetween(
          gps.location.lat(),
          gps.location.lng(),
          prevLat,
          prevLng) != 0) {


      dtostrf(
        (gps.altitude.meters() - prevAlt) /
        TinyGPSPlus::distanceBetween(
          gps.location.lat(),
          gps.location.lng(),
          prevLat,
          prevLng)

        , 5, 2, numStr);

      if (strlen(lnBuffer) &amp;amp;amp;amp;lt; 100)
        strcat(lnBuffer, numStr);
    }
    else {
      if (strlen(lnBuffer) &amp;amp;amp;amp;lt; 100)
        strcat(lnBuffer, P(&amp;amp;amp;amp;quot;0.00&amp;amp;amp;amp;quot;));
    }

    // acceleration
    if (strlen(lnBuffer) &amp;amp;amp;amp;lt; 100)
      strcat(lnBuffer, P(&amp;amp;amp;amp;quot;, &amp;amp;amp;amp;quot;));

    dtostrf((gps.speed.mps() - prevSpeed) / (millis() - prevTime), 7, 4, numStr);

    if (strlen(lnBuffer) &amp;amp;amp;amp;lt; 100)
      strcat(lnBuffer, numStr);

    if (strlen(lnBuffer) &amp;amp;amp;amp;lt; 100)
      strcat(lnBuffer, P(&amp;amp;amp;amp;quot;, &amp;amp;amp;amp;quot;));


    // total milage of trip at this part of logging
    // only increment when moving to minimize
    // &amp;amp;amp;amp;quot;idle&amp;amp;amp;amp;quot; gps hop

    if (prevLat &amp;amp;amp;amp;amp;&amp;amp;amp;amp;amp; gps.speed.mph() &amp;amp;amp;amp;gt; 1) {
      milesSinceBoot +=  TinyGPSPlus::distanceBetween(
                           gps.location.lat(),
                           gps.location.lng(),
                           prevLat,
                           prevLng) * 0.00062137112; // meters to miles
    }

    dtostrf( milesSinceBoot, 5, 2, numStr);

    if (strlen(lnBuffer) &amp;amp;amp;amp;lt; 100)
      strcat(lnBuffer, numStr);

    if (strlen(lnBuffer) &amp;amp;amp;amp;lt; 100)
      strcat(lnBuffer, P(&amp;amp;amp;amp;quot;, &amp;amp;amp;amp;quot;));

    // miles from home
    dtostrf( TinyGPSPlus::distanceBetween(
               gps.location.lat(),
               gps.location.lng(),
               HOMELAT, HOMELNG) * 0.00062137112, 5, 2, numStr);

    if (strlen(lnBuffer) &amp;amp;amp;amp;lt; 105)
      strcat(lnBuffer, numStr);

    // direction from home (for shits and giggles)

    if (strlen(lnBuffer) &amp;amp;amp;amp;lt; 105)
      strcat(lnBuffer, P(&amp;amp;amp;amp;quot;, &amp;amp;amp;amp;quot;));

    if (strlen(lnBuffer) &amp;amp;amp;amp;lt; 110)
      strcat(lnBuffer,     TinyGPSPlus::cardinal(TinyGPSPlus::courseTo(
               HOMELAT, HOMELNG,
               gps.location.lat(),
               gps.location.lng()
             )));


    // save previous lat/lng/alt
    prevLat = gps.location.lat();
    prevLng = gps.location.lng();
    prevAlt = gps.altitude.meters();
    prevSpeed = gps.speed.mps();
    prevTime = millis();

    File dataFile = SD.open(fileName, FILE_WRITE);

    if (dataFile) {
      dataFile.println(lnBuffer);
      dataFile.close();

      // print to the serial port too:
      Serial.println(lnBuffer);
      digitalWrite(6, HIGH);  // green
      digitalWrite(8, LOW); //red
    }
    // if the file isn't open, pop up an error:
    else {
      Serial.print(F(&amp;amp;amp;amp;quot;error opening &amp;amp;amp;amp;quot;));
      Serial.print(fileName);
      Serial.print(&amp;amp;amp;amp;quot;\n&amp;amp;amp;amp;quot;);

      digitalWrite(6, LOW);  // green
      digitalWrite(8, HIGH); //red

    }

    // clear buffer
    lnBuffer[0] = '&amp;amp;amp;amp;#92;&amp;amp;amp;amp;#48;';

  }
}

This is the code current version of the code I use for my GPS logger,Β which is powered by a Neo 6M GPS unit, an Arduino SD Card Reader with an 8 GB MicroSD Card, and an Arduino Nano. It logs a wide variety of information about my current location, speed of travel, and other information so I can easily look back at my trip.

How Much Hillshade is Too Much for Choropleth Maps?

I recently did two maps of Northern Schoharie County’s Median Household Income. I did one with hillshade exaggeration set to 5x while the other one was the normal 1x that I use on both maps. I am divided on which is the prettier map.

Moderate Hillshade

42nd Birthday!

More Extreme Hillshade

I kind of like both maps, but I think the more extreme hillshade is distracting. On the other hand, the more extreme hillshade does bring out the terrain better, and make it easier to perceive the edge of each census blockgroup.

This may be terrain dependent. In a flatter part of the state, such as along Lake Ontario, it may make more sense to increase the amount of hillshade to better capture some of the details of the landscape.

Wondering what is the best level of hillshade for use in choropleth maps.

A Little Hillshade Can Make Choropleth Maps Purty

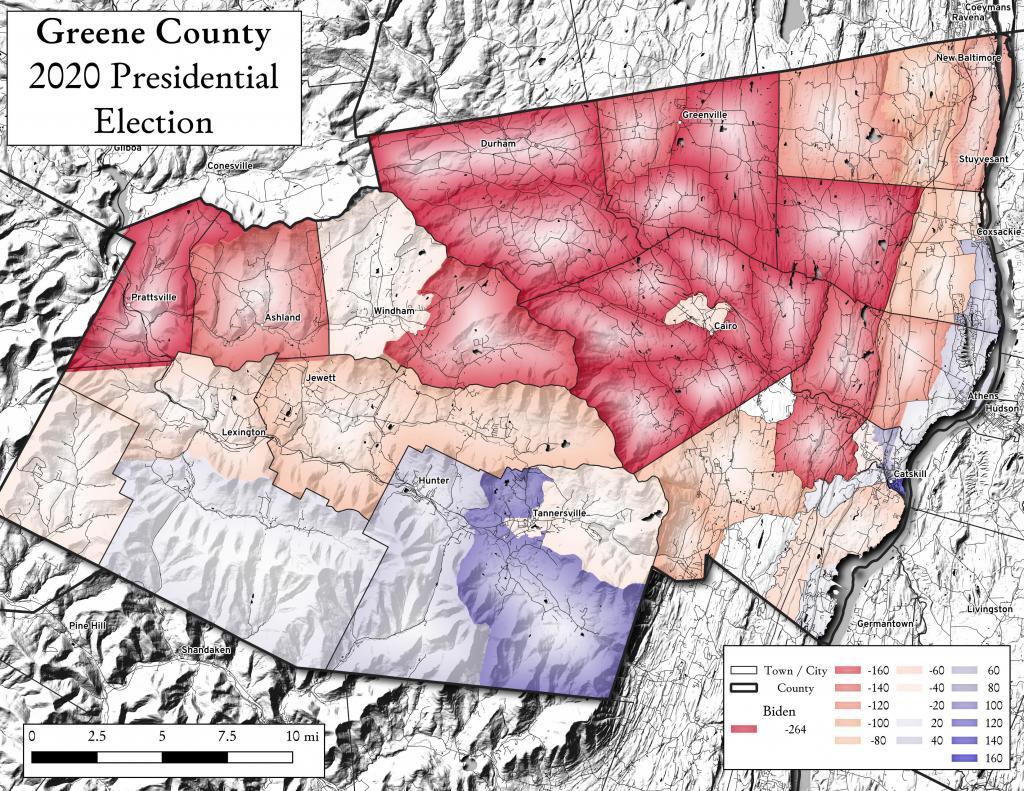
Somewhat accidentally, I started adding hillshade and then rivers and waterbodies to the choropleth maps I was making up. I was shocked by the simple beauty, and how one could make a map much more attractive by adding these relatively minor and unimportant details to a map.

Greene County 2020 Presidential Election

Untitled [Expires August 15 2024]

Field

A little hillshade on a chorpleth map can sure make things a little prettier.