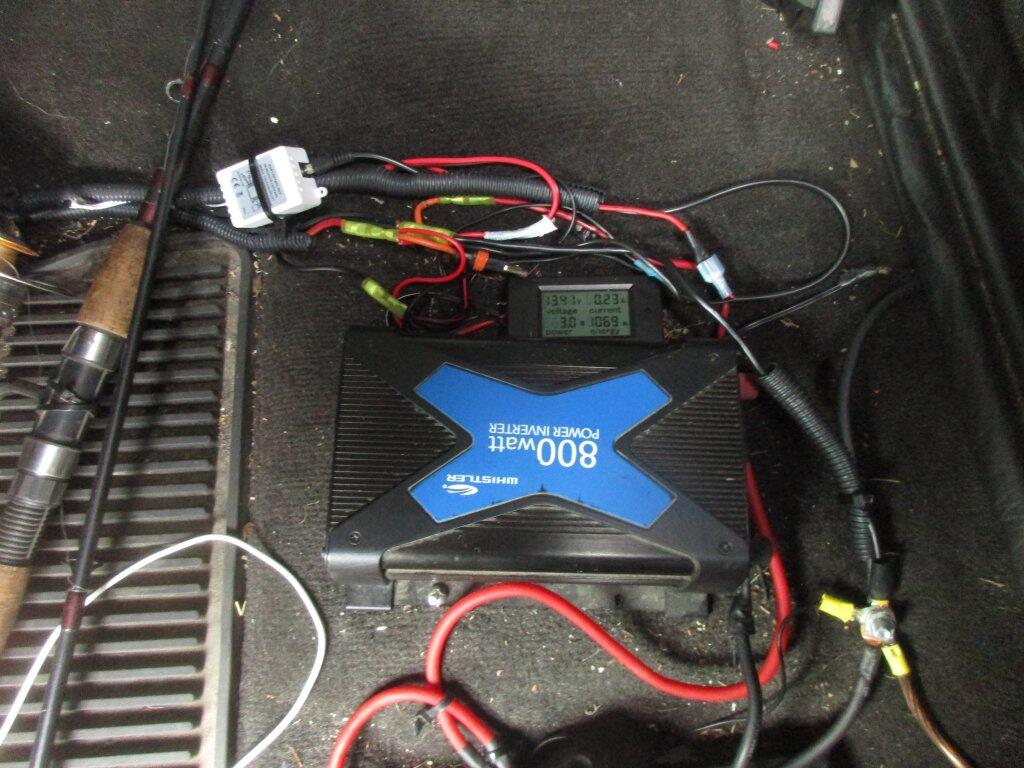
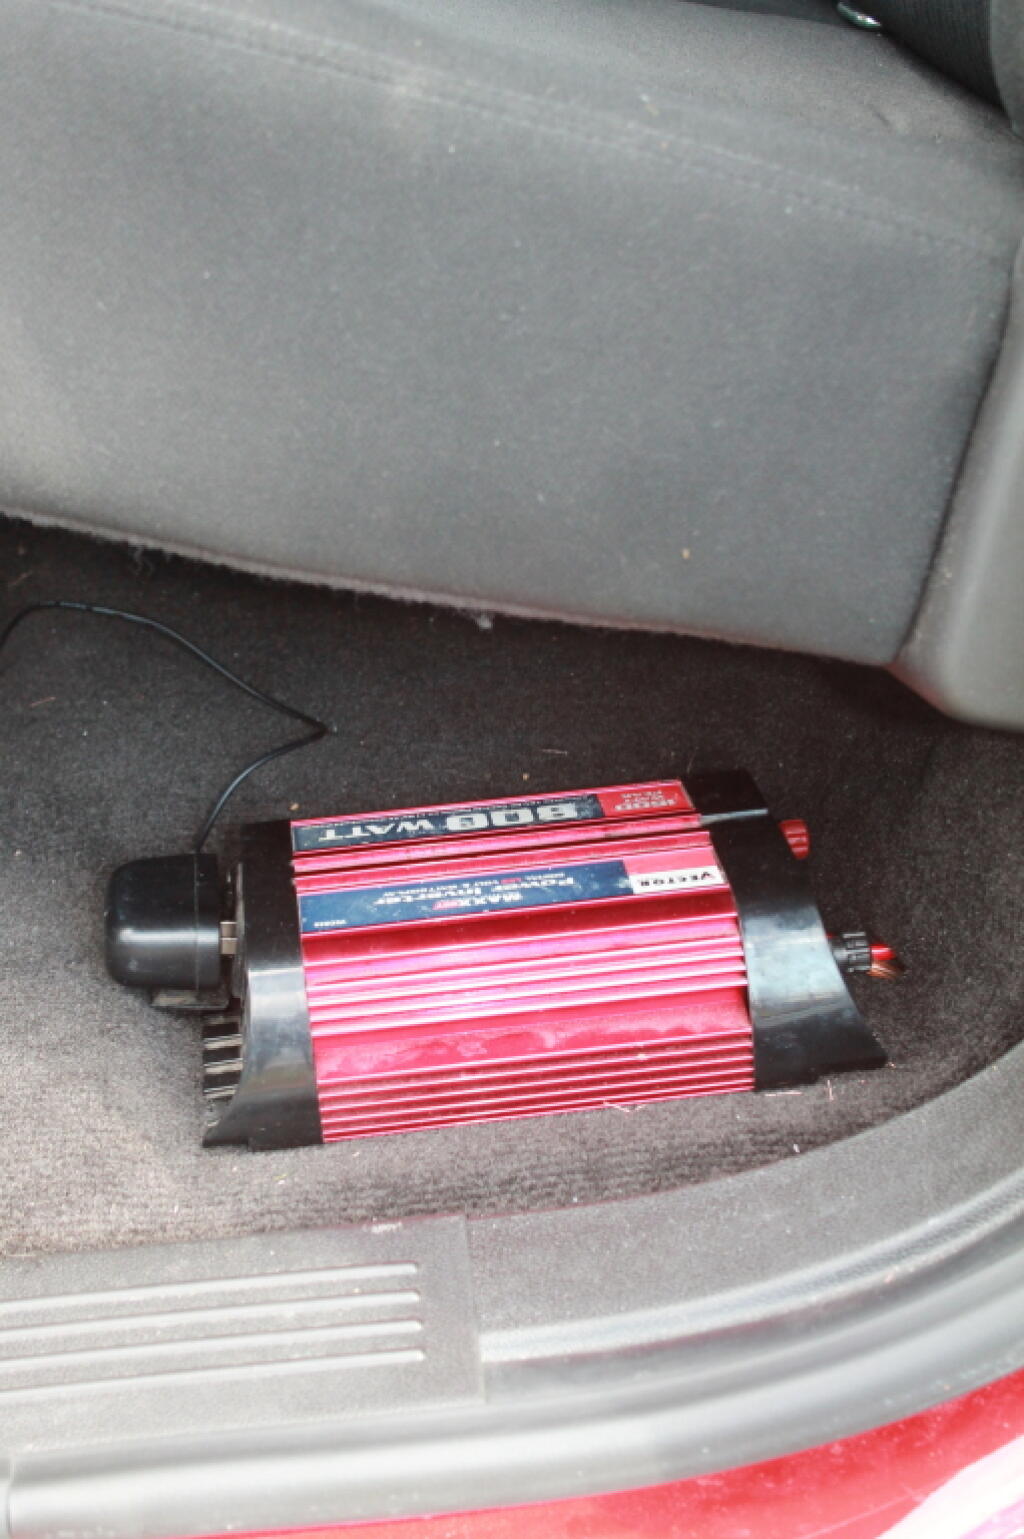
Power Input Meter And Large Inverter
Also notice the fuse.
Taken on Thursday April 12, 2012 at Big Red.The big inverter in my truck is rated 800 watts or 6.5 amps which is the same as 6,500 milliamps. It takes roughly 100 miliamps to stop a human heart. Yet, I don’t give much though to my worn electric cords that in some cases have bare wires. Certainly I could get a nasty shock from them but it’s actually fairly unlikely and a fatal shock is quite unlikely. Why not?
While the inverter will stall and go into fault mode, shutting off output upon overload that’s far above the levels needed for a nasty shock. But because the neutral on the inverter is floating – not tied to the ground and is not supposed to be referenced to the frame of the truck if the isolation is proper the shock risk is quite low. Electricity is defined as the difference in electrons between the hot side and the neutral – in alternating current the difference can be either positive or negative.

But for electricity to exist the neutral and the hot must be connected together at the source – either in the battery, the coil of the alternator / generator or the solar panel. No reference between the hot and the neutral and therefore no power exists.
So if I were to touch the hot wire on one of my electrical wires running off the inverter, no power would be transmitted, even though I’m touching the ground as the hot wire on the inverter is not referenced to the ground, it’s simply referenced to the floating neutral. There is no shock potential unless I touch the neutral wire at the same time, and it’s unlikely such a shock would run through both hands or to the ground.
Large electrical systems are referenced to the earth, because the earth has a fairly stable number of electrons across long distances unlike a floating ground. This means the voltage is more stable and also means if a wire touches the ground if it will quickly throw a breaker. If lightening strikes the line, it also will be quickly passed to the ground, avoiding melting many miles of wire. But it also means if you touch a hot wire, you’ll get a very nasty shock if you are touching the ground.
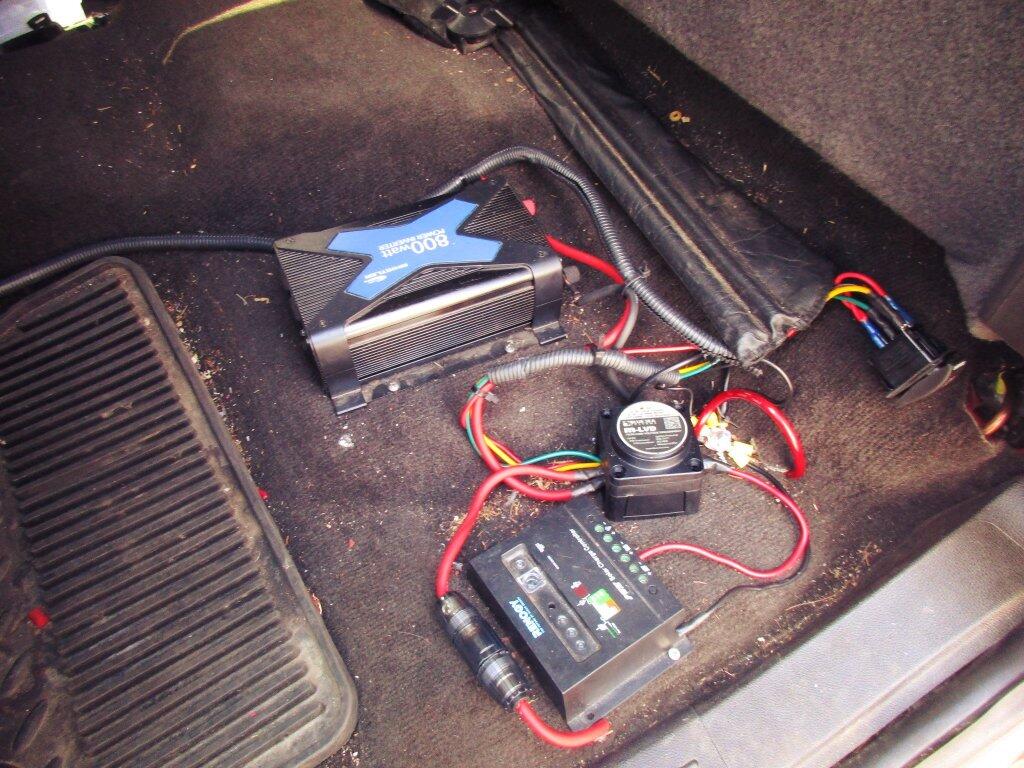
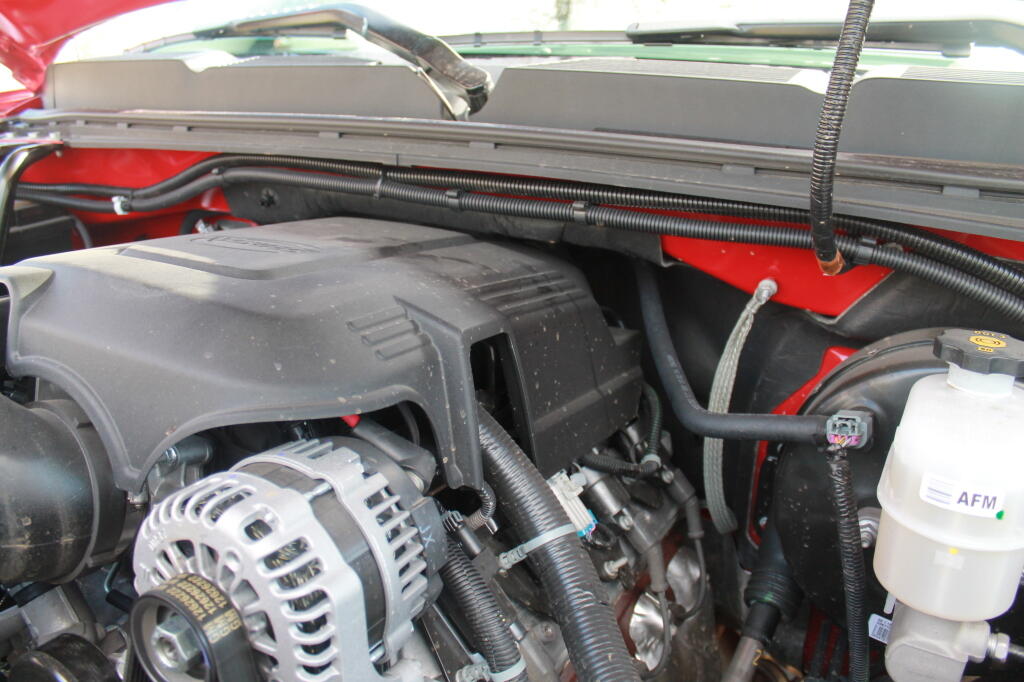
From top to bottom --
Wire for power to CB Radio, Dashboard Camera, Smartphone.
800 watt Inverter
Low voltage disconnect
Low voltage disconnect remote (small module to right)
Fuse to Rear Truck Cap Power
Solar Controller (to be hooked to Solar Panel when using it)
Yes, I need to vacuum out my truck.
Taken on Sunday April 16, 2017 at Big Red.I did not budget for purchasing a new inverter when my old one finally quit. Probably running the electric drill on it when installing the CB radio didn’t help it much, but for a while it had been suggesting the the end was near for it – and I kind of had planned on replacing it when it died this summer. At least it didn’t quit during camping, leaving me in the dark.
I bought a $50 Whistler 800-watt inverter to replace my existing $75 Vector 800-watt inverter. The new inverter lacks a built-in voltage meter, but the 800-watt inverter’s voltage meter was on it’s way out for a while now, so it gave me pretty invalid readings. To deal with the lack of a built-in voltage meter, I purchased and installed a voltage meter in the truck cap, so I can easily keep the track of the battery’s charge while camping.
I bought the Vector inverter the day of Barack Obama’s Democratic National Convention speech during the summer of 2008. I remember that. It got a fair amount of use, for an inexpensive inverter, operating in the often dusty and dirty truck cab. I think the dust along with just the inexpensive design eventually caused the fan to start to wear out and eventually die, causing the inverter to die.
Last summer, the inverter would “suddenly” have a voltage drop, without explanation. The fan was getting noisier, and at least once this winter, the fan did not start up until I tapped it, and I could smell the insides of the inverter starting frying.
 The new inverter is nice. It does have a fan, but the fan only comes on when thermal conditions demand in it. The fan is much quieter too. No grinding noises or hum from this inverter. At first camping, I probably will have trouble sleeping not hearing the soothing hum of the inverter. That’s fine, I appreciate the quiet.
The new inverter which doesn't run the fan at low heat conditions, and has a quieter fan at high-heat conditions is quite nice.
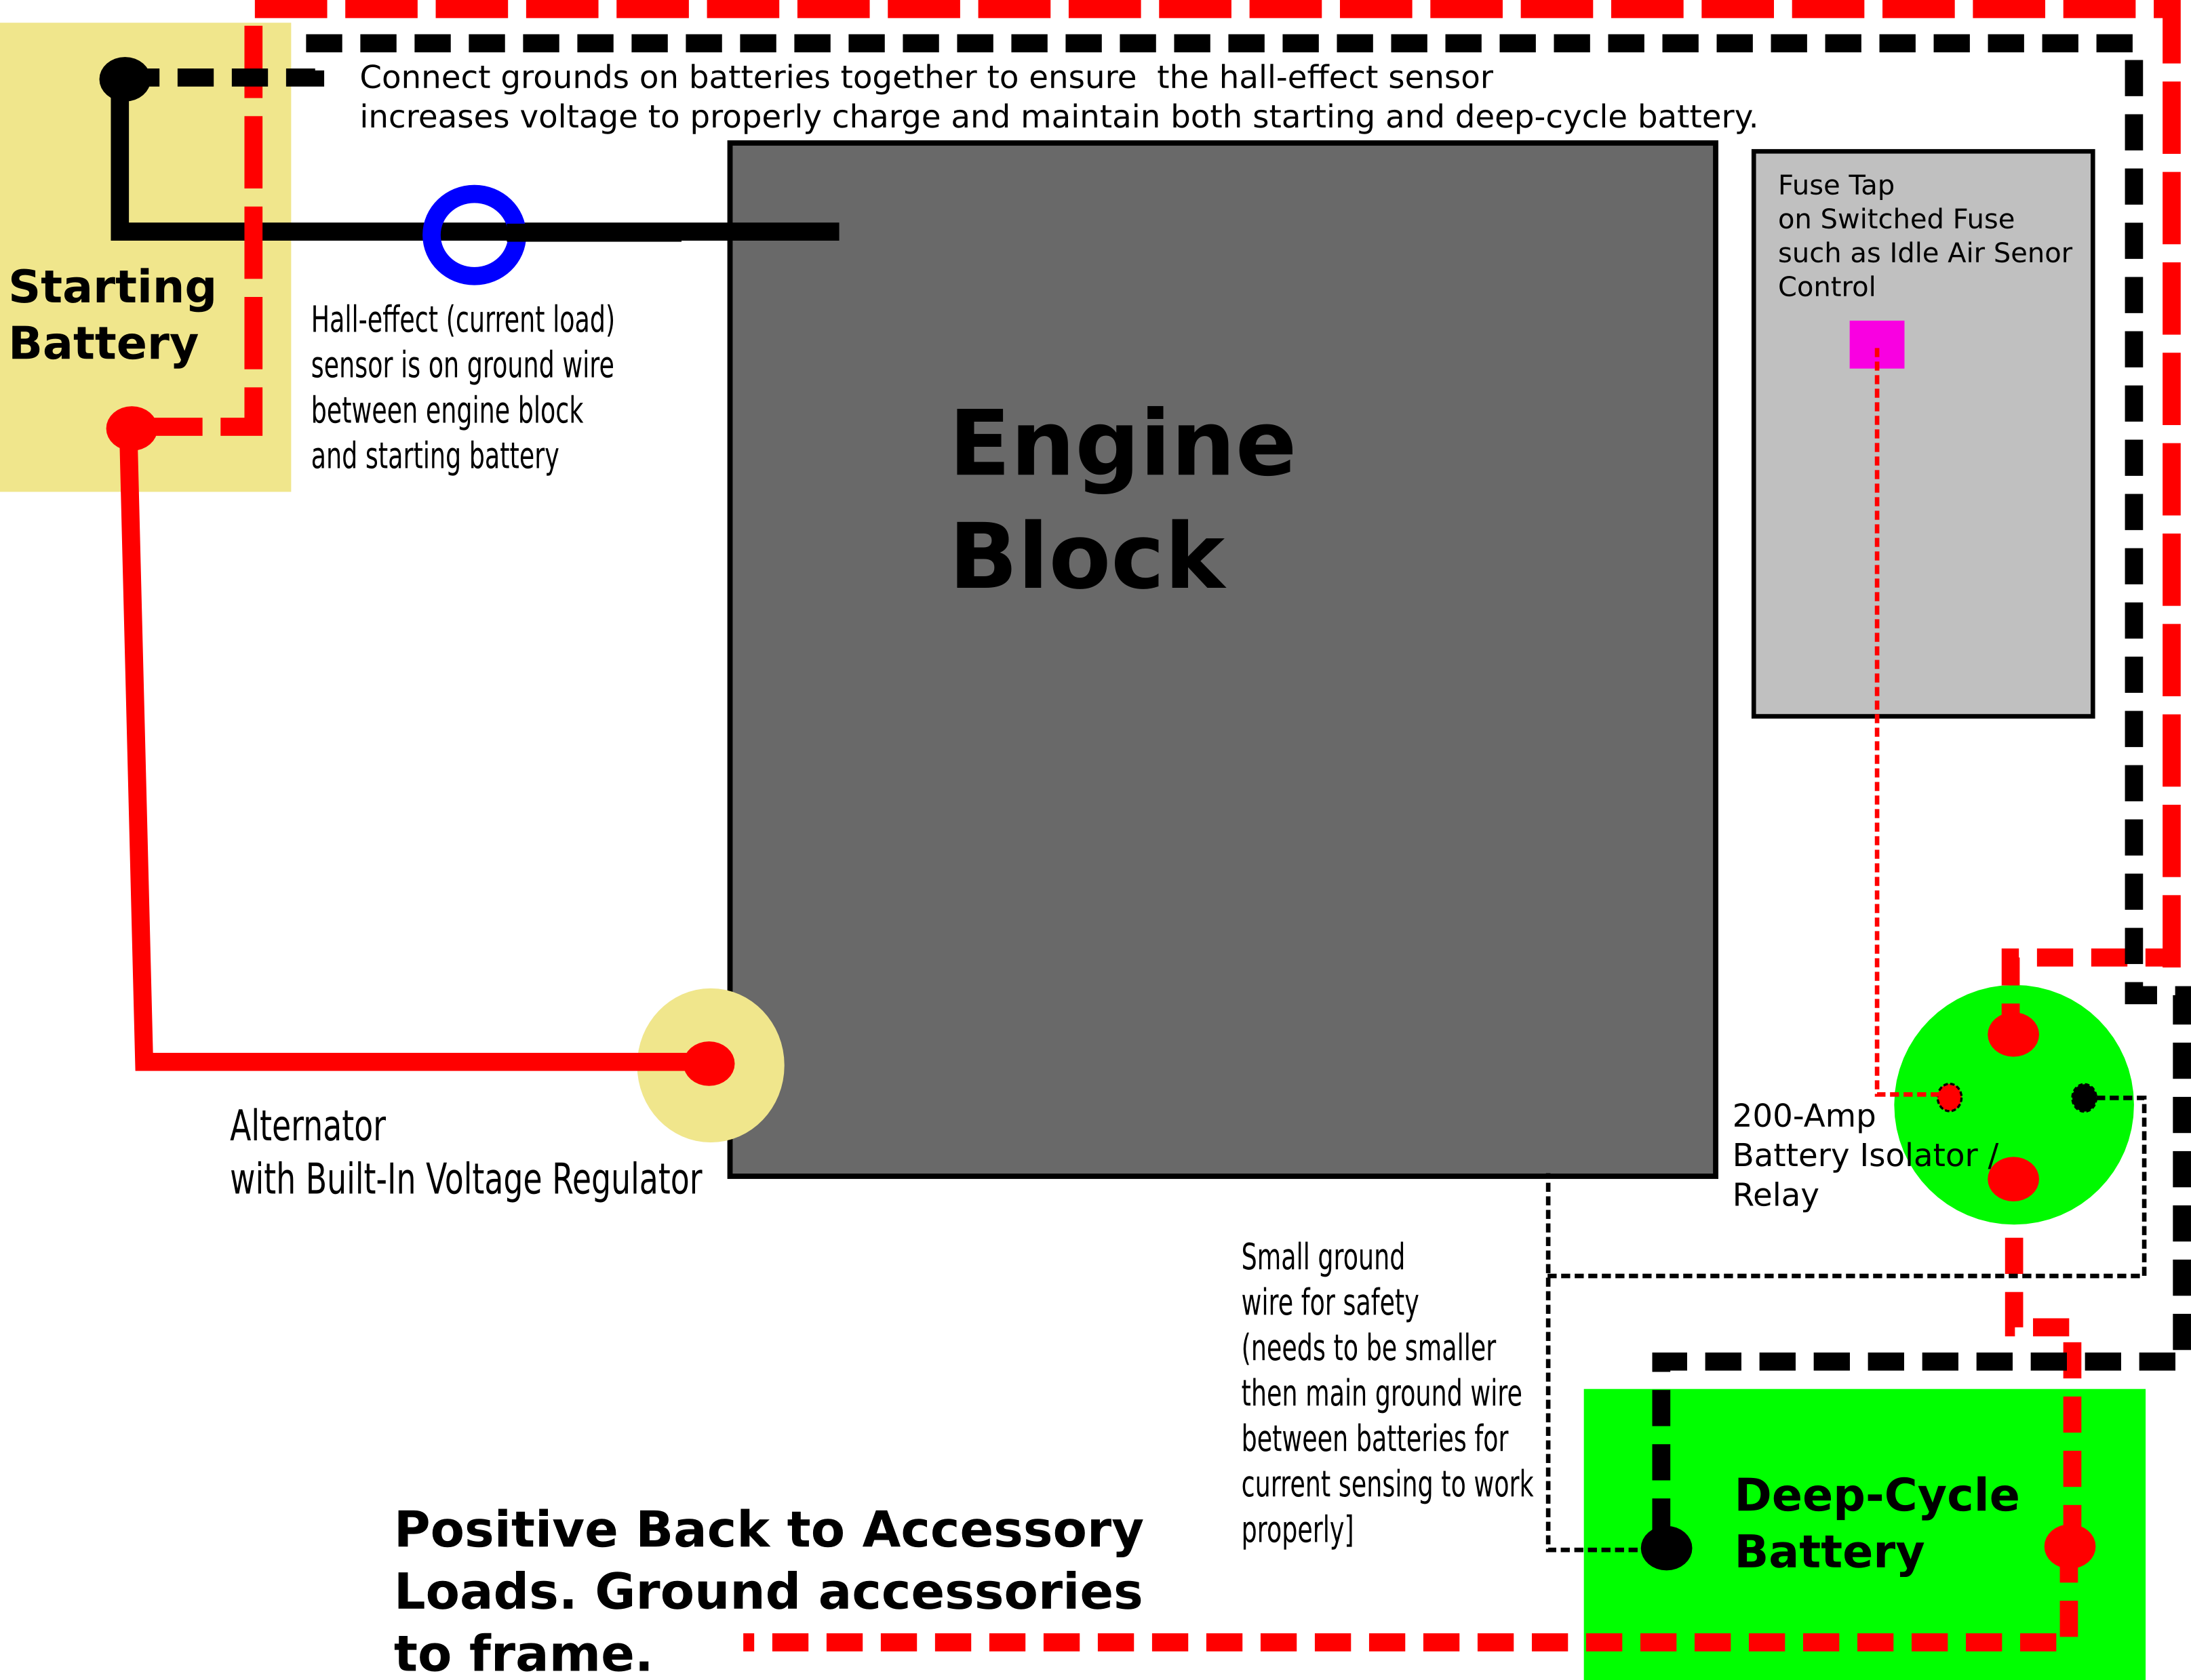
Important Update: Make sure to connect the negative terminals of the two batteries. Grounding to the frame for the accessory battery will not excite the hal-effect (current) sensor, which is located on the negative terminal between the starting battery and alternator on the truck.
Not making this connection will lead to both batteries undercharging, especially in warmer weather or longer trips. Failure to make this connection will cause premature failure of the batteries, potential dead starting batteries, and repeated undercharging. You have been warned.
Since 2004, I have always run a power inverter off my truck, that converts 12 volt DC power into 120 volt household power. I use it extensively through the summer season to provide light and power to camp for small appliances like my alarm clock, laptop, and electric lighting. Electric lighting really beats any other camp lighting.
My current set up uses a Vector-brand 800-watt Power Inverter, connected to a second battery, that is disconnected from the starting battery when the engine is off. There is no danger of a dead starting battery as the second battery is disconnected from starting battery when the truck is off. Once the truck is turned on, the isolator relay reconnects the second battery to the alternator.
As long as you don’t drop the battery below 11.3 volts — where the inverter automatically turns off due to low voltage, you will have constant 120 volt output. As the isolator does not kick in until the alternator is spinning, there is no voltage drop when the engine is cranking.
When I got my 2011 Chevrolet Silverado to replace my old pickup, I was quite happy to discover that all full-size pickups come with dual battery locations, and at least with All-Star Edition Silverado, all of the hardware for installing a second battery exists (second battery tray, high-output 145 amp alternator), except for the $5 tie down and the wiring.
The installation would have cost me a total of around $475, although $75 of it was the inverter I had already purchased years ago and have moved on over my old truck.
The parts total was $305. Not too bad. If were to install it all myself, it would have required additional tools like a battery cable crimp, plastic molding puller, sealants, which if you don’t own such tools and parts would add costs. In addition, you would have to buy extra parts in packages you wouldn’t neccessarly use. That proaly would add up to close to $150, plus your time isn’t free.
I had Boomer-McCloud, on Central Ave in Albany, a chain automobile electronics/car audio wiring store, do all the wiring, install the isolator and assorted related parts. They did it in two hours of labor, which cost $150. While the wiring is not rocket science, having it professionally done, increased the quality over what it would have been done had I done it myself. I am not a wiring expert, even if I know how electrons flow.
Boomer-McLoud did all of the wiring and installation, although I had to purchase the battery and tie down, and also provide the battery inverter.
I decided to get a Walmart Everstart 24DC-6 Marine Battery, which is a dual purpose battery for starting and deep cycle. Walmart Everstart batteries are pretty good quality for the price, they are manufactured by Johnson Controls in the USA. I would have gotten a true deep-cycle, but I was on a budget, and finding something that would fit in the battery tray was a bit of a challenge. I figured if going to take some abuse — occassionally being overly deep cycled — I might as well not spend a fortune.

The Walmart Everstart 24DC-6 Marine Battery fit perfectly in the tray without sliding or being oversized, although is slightly taller then the standard Group 48 battery. It has a 101 amp/hr rating, which is sufficent power for at least a day’s worth of camp compact florescent lighting and small appliances like an alarm clock, cellphone chargers, etc. If battery gets too low, you just fire up the truck and charge it up.
Then I went to DePaula Chevrolet’s Parts Department and picked up a battery tie down. You just want the tie down plate and battery bolt. It’s like $5 for both of those parts. I then had to install the battery myself, and tie it down. You will need several long socket extensions to reach below the battery to install the tie down bolt. Once it’s installed, the battery is very secure, just like the factory battery.
Then I had to make an appointment with Boomer-McLoud, and explain what I wanted to do. They had some questions, and I showed them where I wanted the inverter mounted, and they did the rest. I just dropped it off before work one day, then picked it up later in the afternoon. Paid $315 with tax. Hit the switch on the inverter, plugged in electronics, and I was off.
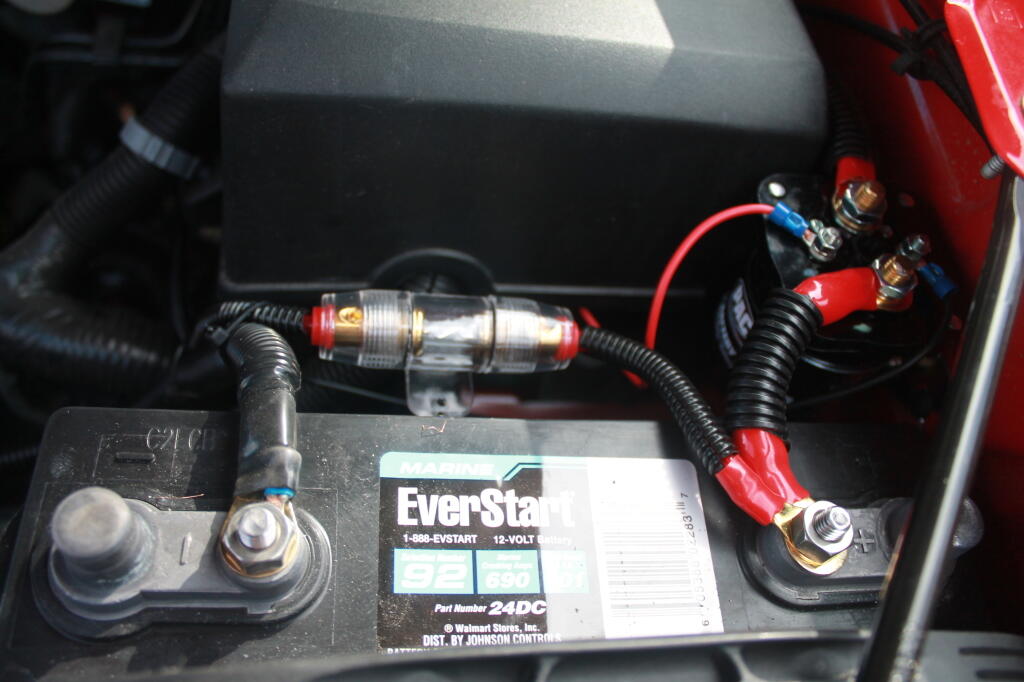
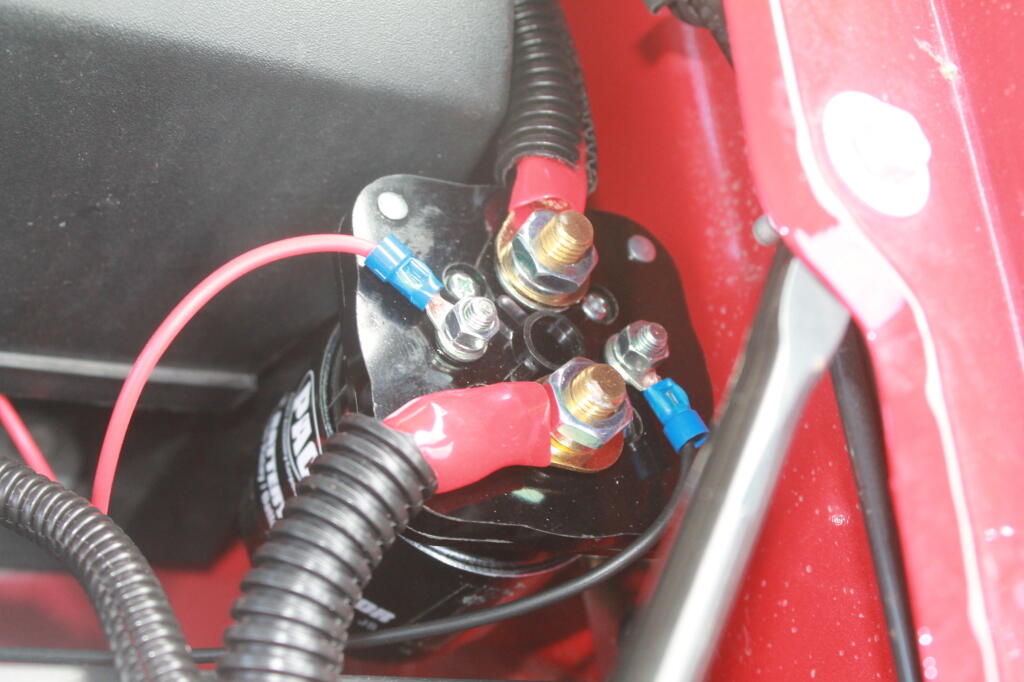
This is the second battery, with the isolator mounted close to it.
The isolator is like a giant electro-mechanical switch or relay, that is closed or “excited” by a small amount of current that causes the relay to shut. It is excited by a fuse tap in the Throttle Position Sensor Fuse from the main power bus. In the background is the main fuse bus, with the top off it.

Rather then mess with any factory wiring, the main feed wire comes off of the main (starting) battery terminal. Notice the 150 amp fuse for safety. You don’t want a shorted wire to equal a fire.

Here are the fuses and other wires coming off the second (inverter battery).

And finally, the power feed to the second battery, runs right on top of the main power bus from the Main Power Bus Distribution Box, just like how Chevy does it with the factory second battery install.
I’ve only used this set up for a couple of nights, but appears to work real well. The starting battery never gets low, the camp power works well all night long. you can easily plug in heavier loads like my 90-watt laptop adapter, and there is no dimming of headlines or sign of stress on the alternator.
I hope this is helpful. Please feel free to email me with any questions. — Andy
One of my fears is that I will get stuck in the process of buying land and building a cabin on it. In many ways, it’s a much more complicated and drawn out process then simply looking at a house, going through a well established path of real estate agents, title searches, house inspection, and traditional mortgage but it also turns out not to be an impossible project without many construction skills or equipment.
In some ways buying raw or minimally developed land (such as an old trailer site or badly damaged home with some infrastructure), especially with cash is a much harder road to hoe. While I haven’t totally written off getting a mortgage — there are tax benefits, namely you can reduce your total income by the amount you pay in mortgage interest — the cost of money these days makes it seem like a waste. And I worry about getting ripped off, and regulatory issues more generally as all of this world is very new and complicated to me. I’ve always preferred to pay with cash, it’s generally cheaper though it will involve cashing out stocks and paying a shit ton of Capital Gains taxes.
Right now I am at the stage at studying parcels that are currently on the market and giving it some thought. What is out there without a home? What are the prices? How far from work? How close to neighbors or potential neighbors who could complain about things to the town? Since drafting my first draft of the homestead and cabin on Saturday, I think I have a better idea — the priority being having the right redneck kind of neighbors, general distance from neighbors, ability to homestead with livestock and have bonfires, ride an ATV around the property, heat with wood, compost, garden and use on-site solar to avoid being tied to growing expense of the dirty power of the electrical grid. Buy and build what I actually want, even if that’s somewhat more expensive then I’d like to spend and not what other people want from the property.
I’m teaching myself LibreCAD so I can draw my vision for the home and the property that I want in a way that is presentable to potential sellers or their real estate agents, town building officials, and architects. I am not a very good hand drawer, and knowing at least some CAD and floor plan design drawing techniques will be good to illustrate my vision to the appropriate people. While I am sure not all of my ideas can be implemented due to regulatory and cost reasons, being able to have a clear idea of what I want on paper, in an easily readable form will make it much easier to obtain what I want.
Maybe the best way to judge my progress is to have a rough time table :